How to Manage Device Channel using Design Manager?
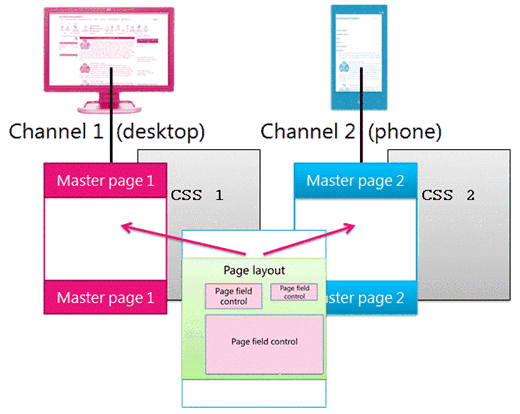
By using different master pages and CSS per channel, identical page content can be presented in different ways for specific devices (for example, Windows Phone) or groups of devices (all smart phones).
What is a Device Channel?
A device channel is part of the SharePoint 2013 publishing infrastructure that enables you to render certain site content, style your content, and even change images—while maintaining the same URL across a pool of different devices. Compared to the desktop version of the SharePoint site, a mobile rendering can be formatted with a smaller width, have better navigation with wider touch targets, and show a reduced amount of information for better usability. You can create a single site, and author and edit the content a single time for all your different mobile devices. When a user browses a SharePoint site from a mobile device such as a smartphone or tablet, the mobile browser submits to the site an HTTP GET request that includes a user agent string. This string contains information about the type of device that is trying to access the site. Based on that device substring, the device browser can be redirected to a specific master page view. For example, if you have a collection of Windows Phone and iPad devices, you can provide each pool with a unique rendering of the SharePoint publishing site by using device channels. These device channels can each be given a different master page and thus CSS file to give users a more optimal viewing experience.
 |
| Design Channel |
To manage Device Channels you need to use the following steps. This step helps you to create the device Chanel at the batter way.
- To manage the device channel the site collection must be either have publishing portal site template or activate the publishing Infrastructure feature at the site collection level as well as the web level.
- Navigate to the Site Settings under Look and Feel section Design Manager.
- You need to identify the type of
- Identify the type of device your site going to run.
- When you create a device channel, you specify the user agent substrings for the devices that you want the channel to target. This gives you fine-tuned control over what devices (or browsers) are captured by each channel. Then you assign a master page to that channel; in turn, each master page links to its own style sheet where the layout and styles are optimized for that type of device.
- To Check the Agent Information “http://www.useragentstring.com/pages/useragentstring.php” site give you the information about the user agent.
- Navigate to the device Manager and Click to “Manage Device Channels”. Click “Create a Channels” to add new channel. For change the order of the channel click “Edit or reorder existing channels”.
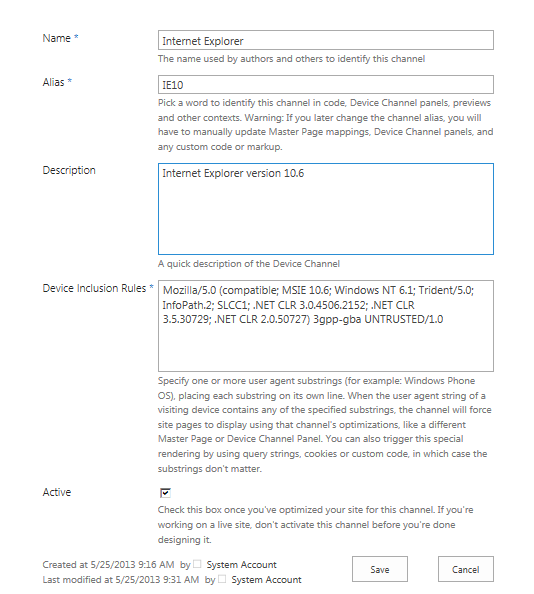
- Click “Create a channel” you will see the below screen. It has the “Name” , “Alias” , “Description” and “Device inclusion rule” fields. Below table shows the fields name and it req. value and value of that filed.
Field
|
Req. Value
|
Value
|
Name
|
Yes
|
This is the name of your design channel. It can be a friendly name to identify the channel.
|
Alias
|
Yes
|
The alias name enables you to identify your device channel in code, device channel panels (discussed later in this article), previews, and other contexts.
Note: If you later change the channel alias, you'll have to manually update master page mappings, device channel panels, and any custom code or markup.
|
Description
|
No
|
A field for supplying a general description for the device channel.
|
Device Inclusion Rules
|
Yes
|
A field for supplying the user agent substring such as Windows Phone OS. Device redirection to a specific master page depends on what is entered for this value.
|
Active
|
No
|
Selecting this check box activates your device channel. If you are working on a live site, you should not activate the channel before you have finished designing it. For testing, you can use the query string ?DeviceChannel=alias within a browser to preview your site for a specific channel.
|
 |
| Design Manager: IE Device Channel Settings (Create New Device Channel) |
- I have entered all the required information for “Internet Explorer”. I have enter Name as “Internet Explorer”, Alias without any special character and Space I give it a name “IE10”, Description give it about the channel, Device Inclusion rule I grabbed from this “http://www.useragentstring.com/pages/Internet%20Explorer/” URL and last Mark “Active” checkbox and save the settings.
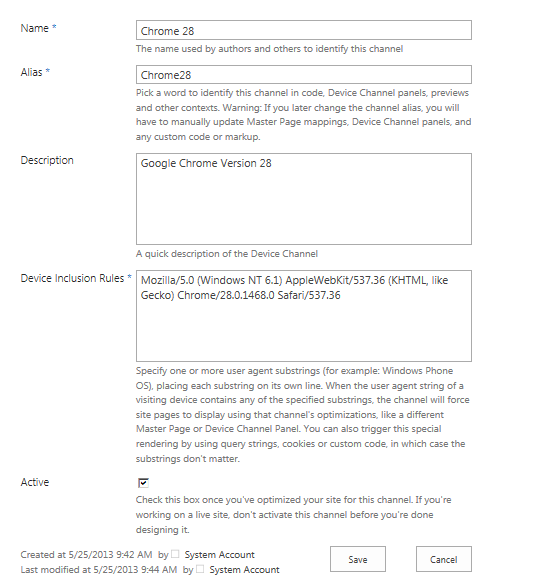
- For Google Chrome device setting see the below screenshot.
- For iPhone device setting see the below image for the same.
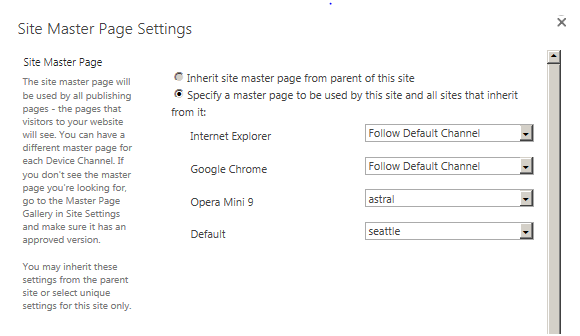
- After a device channel is created and activated, device redirection to a specific master page, for example a mobile version, is possible. The next step is to specify what master page should be displayed for mobile devices at the site level, through either the Site Master Page Settings or by using the Publish and Apply option in Design Manager.
 |
| Set Master Page |
To Change a Device Channel
Use this procedure to create a new device channel.
- Start Design Manager. (For example, on the Settings menu, choose Design Manager.)
- In the numbered list, select Manage Device Channels.
- On the Design Manager: Manage Device Channels page, choose Edit or reorder existing channels.
- In the Device Channels list, select the device channel that you want to change, and then, on the ITEMS tab, choose Edit Item.
- To change the name of the device channel, enter a new name in the Name text box.
- To change the alias of the device channel, enter a new alias in the Alias text box.
- Note: If you change a device channel's alias, you must manually change the alias in other places where you use it. For example, you must manually change the alias in custom code or markup, and you must manually change the mappings between the device channel and master pages.
- To change the description of the device channel, enter a new description in the Description text box.
- To change the device inclusion rules, edit the strings in the Device Inclusion Rules text box.
- To make the device channel active, select the Active check box. To make the channel inactive, clear the Active check box.
- Choose Save.
Delete a Device Channel
Use this procedure to create a new device channel.
Note: you cannot delete the default channel.
- Start Design Manager. (For example, on the Settings menu, choose Design Manager.)
- In the numbered list, select Manage Device Channels.
- On the Design Manager: Manage Device Channels page, choose Edit or reorder existing channels.
- In the Device Channels list, select the device channel that you want to delete.
- On the ITEMS tab, choose Delete Item.
- Choose OK.
To reorder the Device Channel
Use this procedure to create a new device channel.
- Start Design Manager. (For example, on the Settings menu, choose Design Manager.)
- In the numbered list, select Manage Device Channels.
- On the Design Manager: Manage Device Channels page, choose Edit or reorder existing channels.
- On the ITEMS tab, choose Reorder Channels.
- On the Device Channel Reordering page, choose the channel whose order you want to change, and then select Move Up or Move Down.
- After the channels are ordered the way that you want them, choose OK.


